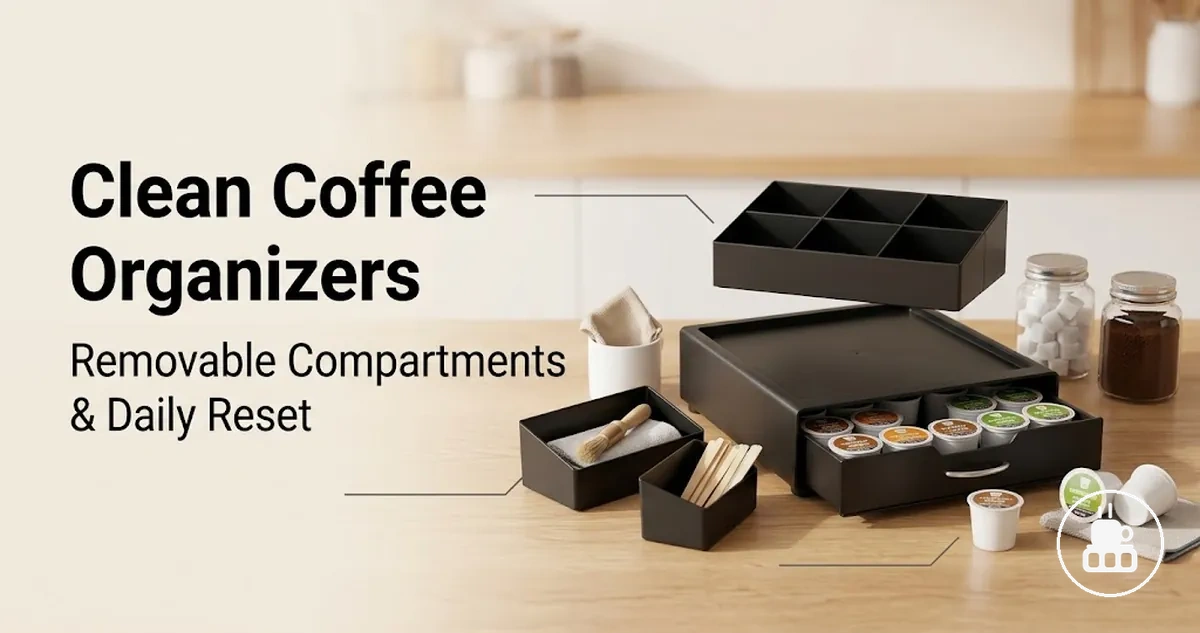
Coffee Station Organizer Cleaning and Maintenance
A coffee station organizer needs regular cleaning and maintenance to keep its compartments, dividers, tray, stored supplies, and counter area clean, usable, and hygienic. The goal is to remove residue while helping supplies stay organized and ready for daily use. Cleaning methods and maintenance frequency depend on the organizer's material, compartment access, removable parts, spill exposure, and daily supply handling.
Daily use can leave pod fragments, sugar, syrup, dust, or other residue inside a coffee bar organizer. A damp cloth may be suitable for many wipe-clean surfaces, while acrylic, plastic, bamboo, wood, and other materials may require different care so they can dry properly before supplies are returned. A drip mat or organizer tray may also collect spills around the counter area. This page focuses on maintaining the organizer and nearby surfaces rather than cleaning a coffee machine reservoir, except when cleaning nearby spills.
Regular maintenance becomes easier when the organizer, stored supplies, and counter area are treated as separate cleaning areas before everything is reset. Compartments, dividers, trays, and absorbent accessories may each need a different approach depending on their material and exposure to moisture or residue. The following sections explain how to care for each part of a coffee station organizer while keeping maintenance practical and material-appropriate.
Coffee Station Organizer Maintenance Scope
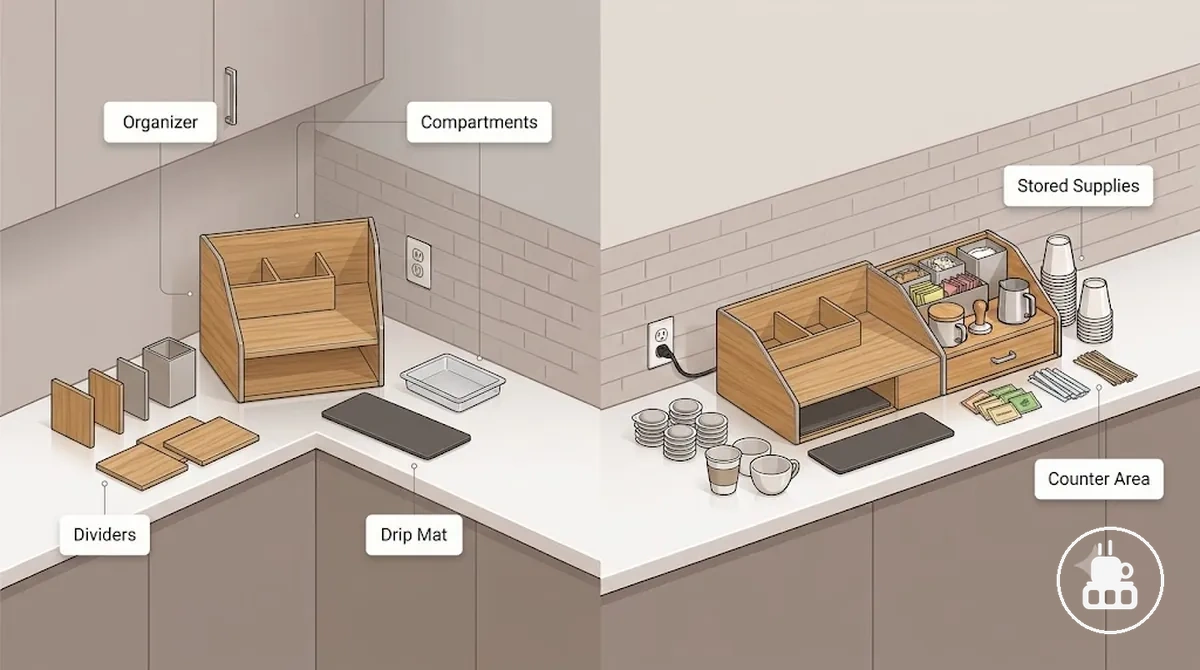
Coffee Station Organizer Maintenance Scope covers removing supplies, cleaning organizer surfaces, drying parts, and resetting stored items safely. It includes the organizer body, compartments, removable dividers, tray, drip mat, pods, cups, sweeteners, stirrers, and the counter-contact area around the organizer. The goal is to keep these parts clean, organized, and ready for daily use while limiting residue buildup. Coffee maker reservoir cleaning and machine descaling remain outside this organizer-focused scope because they involve the appliance rather than the organizer, except when a spill reaches the organizer area.
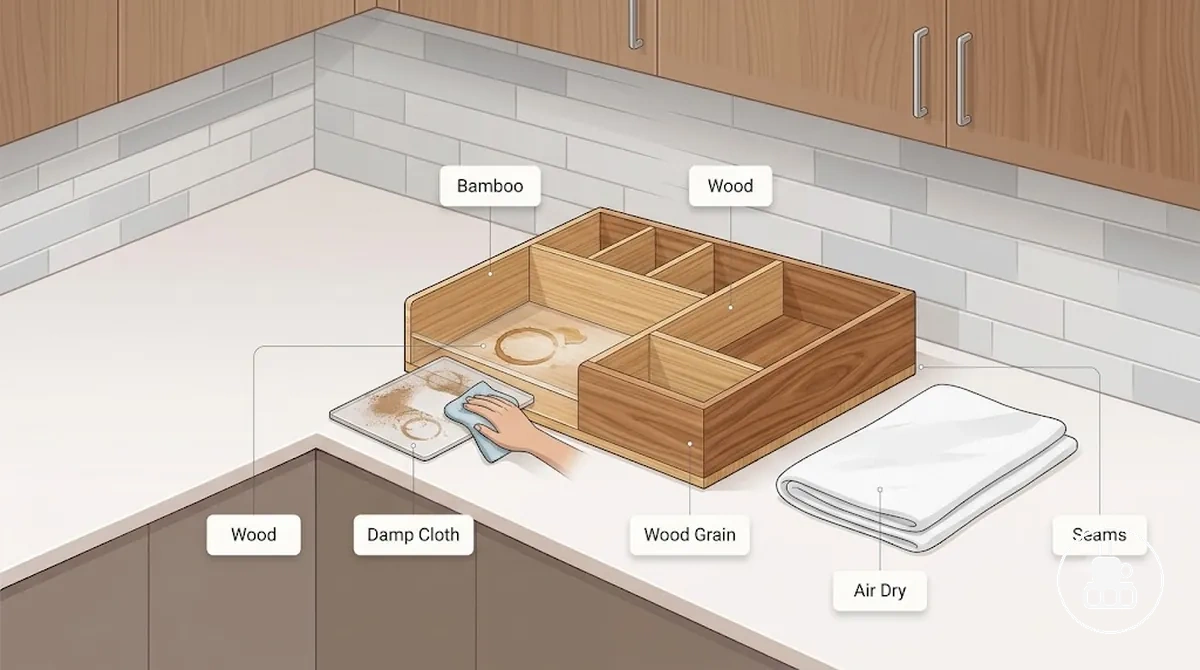
Coffee Station Organizer Maintenance Scope depends on task frequency and spill exposure. The image below identifies the organizer parts included in routine maintenance and highlights the supplies and counter-contact area that belong within this scope.
- Daily: Remove or set aside pods, cups, sweeteners, and stirrers as needed, clean visible surfaces, and reset stored items after the area is dry.
- Weekly: Check compartments, removable dividers, the tray, and the drip mat for residue, then clean and dry them using a method that suits the material.
- After spills: Clean the affected organizer surfaces and counter-contact area when spills occur, then allow parts to dry before returning stored supplies.
For a broader overview of coffee station organizers, see the main guide before continuing. The next section explains how cleaning methods may vary by material while keeping the same maintenance scope.
Cleaning Methods by Material and Surface
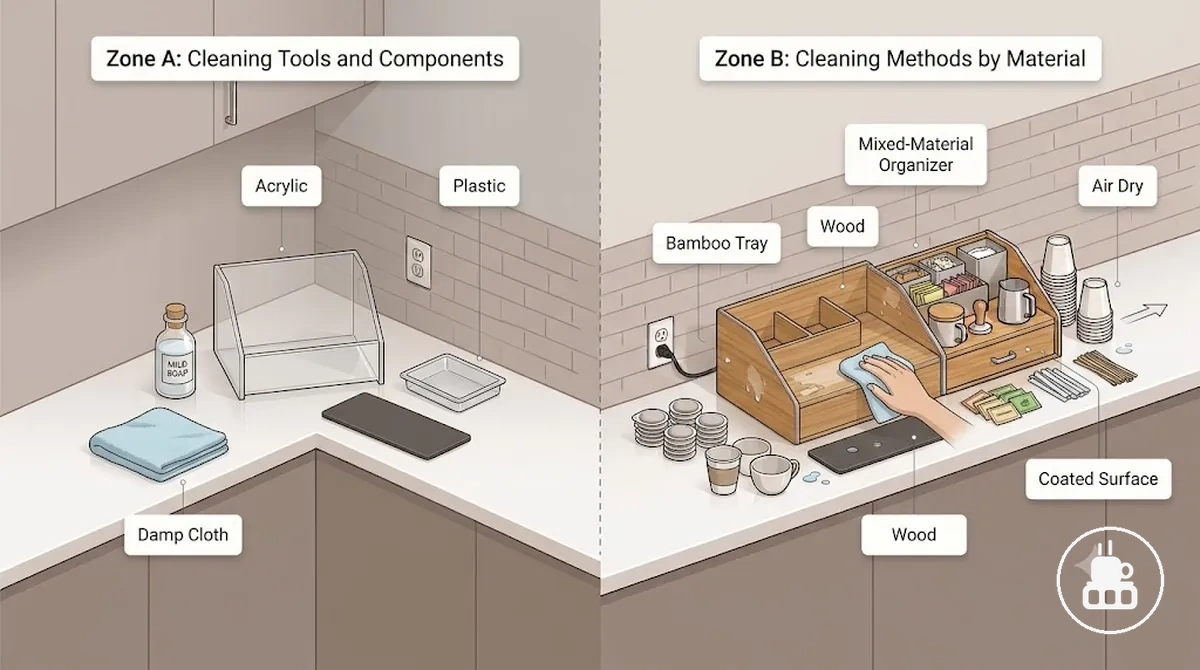
Cleaning Methods by Material and Surface depend on the organizer's material, surface finish, moisture tolerance, scratch resistance, and drying needs. A cleaning method that suits one material may not be appropriate for another, especially when coatings or mixed materials are involved. Choosing care based on material can help reduce unnecessary wear while keeping the organizer clean. Avoid using the same cleaning approach for every organizer because finishes and materials can respond differently.
Material and surface characteristics determine how much moisture, wiping, or gentle cleaning an organizer may tolerate. Wipe-clean acrylic and plastic surfaces often differ from bamboo or wood, which may require more controlled moisture and thorough drying. Coated surfaces and mixed-material organizers may also need qualified care to help protect their finish. The table below compares common material considerations.
| Material or surface | Cleaning method | Moisture limit | Risk to avoid |
|---|---|---|---|
| Acrylic | Soft damp cloth with mild soap when needed | Light surface moisture | Abrasive cleaning that may reduce clarity |
| Plastic | Damp cloth with mild soap when residue requires it | Routine surface wiping | Harsh scrubbers that may mark the surface |
| Bamboo | Light damp cloth followed by air drying | Limited prolonged moisture | Extended wet exposure that may affect the material |
| Wood | Gentle wiping with mild soap only when appropriate, then dry | Low moisture exposure | Soaking or leaving the surface damp |
| Coated surface | Damp cloth with mild soap suitable for the finish | Depends on the coating's moisture tolerance | Cleaners that may damage the coating |
| Mixed-material organizers | Clean each material according to its needs | Use the most moisture-sensitive part as the guide | Excess moisture around seams or joins |
The table is intended as a material-selection guide rather than a universal cleaning recipe. Coffee stains, sticky syrup, dust, and routine damp cloth care may require different approaches depending on the surface and finish. Understanding these differences also helps when comparing value and maintenance tradeoffs across different organizer materials.
Acrylic and Plastic Surfaces
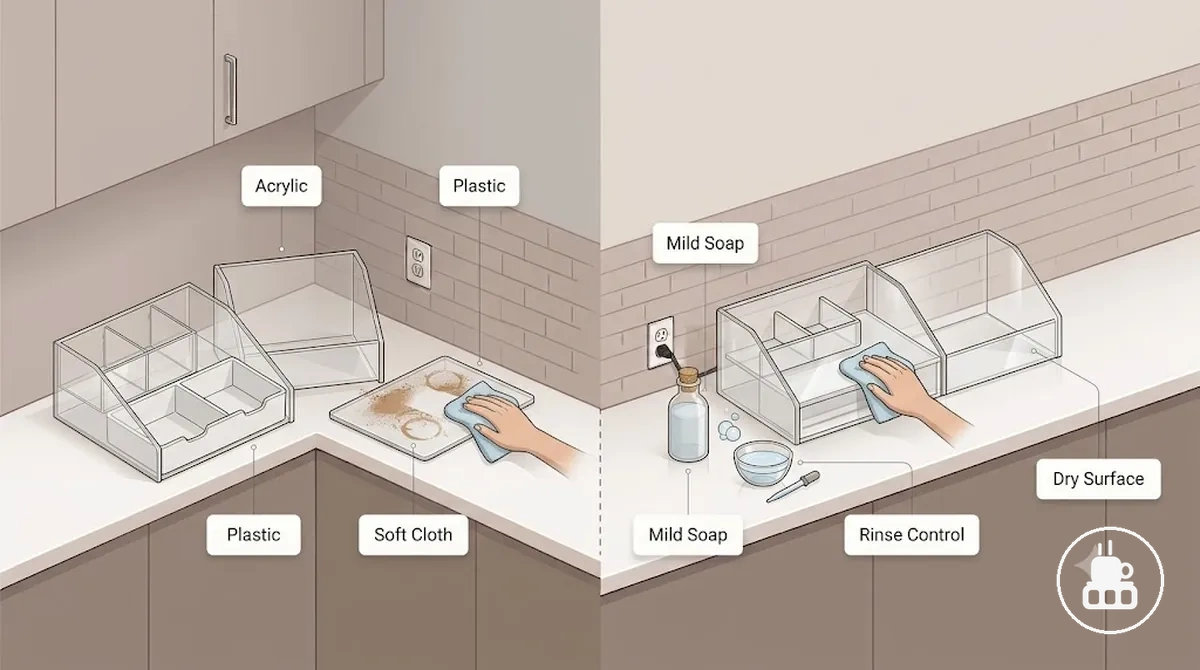
Acrylic and plastic surfaces are usually cleaned most safely with a soft cloth, a damp cloth, and mild soap when needed. Acrylic surfaces can lose clarity if scratches or cloudiness develop, so gentle wiping is generally preferred over aggressive scrubbing. Plastic surfaces also benefit from mild soap, light rinse control, and thorough drying after cleaning. Avoid abrasive pads because scratch risk and cloudiness may depend on the surface condition.
Acrylic and Plastic Surfaces benefit from gentle wipe-clean care. The image below demonstrates how cloth choice, rinse control, and drying help maintain clear organizer surfaces while reducing scratch risk.
- Use a soft cloth or microfiber cloth to help reduce scratch risk on a clear organizer surface.
- Apply mild soap with a damp cloth when coffee residue or a light coffee stain needs gentle cleaning.
- Keep rinse control light and dry the surface after wiping to help maintain clarity and reduce water marks.
- For static dust or remaining residue, repeat gentle cleaning before considering a stronger cleaner, because the result may depend on the surface condition.
Bamboo and Wood Organizer Trays
Bamboo and wood organizer trays need moisture-limited cleaning to help protect the finish, grain, and seams. A lightly damp cloth is usually a safer choice than excess moisture, especially when the finish or coating is unknown. After wiping, allow the bamboo tray or wood tray to air dry before returning stored items. Excess moisture can increase the risk of warping or changes to the finish, so careful drying is an important part of routine care.
Bamboo and Wood Organizer Trays rely on moisture control to help protect natural surfaces. The image below shows moisture-limited cleaning with a damp cloth and careful air drying.
- Do: Wipe the organizer tray gently with a damp cloth, paying attention to the grain and seams, then let it air dry to help protect the finish.
- Avoid: Leaving standing moisture on the tray, because the result may vary with the coating and material condition.
- Do: For sticky coffee rings or syrup residue, repeat light wiping and allow dry time between passes.
- Avoid: Treating bamboo or wood like plastic, because prolonged moisture may increase the risk of staining, odor, or warping depending on the finish.
How to Clean Compartments, Dividers, and Trays
Cleaning compartments, dividers, and trays starts by emptying each section, cleaning every part according to its material, and allowing all surfaces to dry before supplies return. Following the same sequence each time helps keep residue contained and reduces the chance of returning moisture to storage areas. Material-sensitive parts may require slight adjustments during cleaning and drying.
Crumbs often collect in compartments and corners, while sugar granules, coffee splashes, dust, and syrup residue may settle in dividers, tray bases, or removable inserts. Each residue type may need a different cleaning intensity, so accessible surfaces should be cleaned first before moving into tighter sections and corners. The steps below organize the process from emptying the organizer to the final reset.
- Empty all compartments, dividers, trays, and removable inserts so every surface and corner can be reached. Brush away loose crumbs before wiping.
- Wipe compartments, tray surfaces, and corners with a damp cloth suited to the material. Remove loose sugar granules or dust before wiping to help avoid spreading residue.
- Lift removable inserts and dividers when possible, clean around the storage wells, then dry each part before reinstalling it.
- For coffee splashes or light syrup residue, use repeated gentle wiping before increasing cleaning intensity. If residue remains, additional passes may be more suitable than aggressive scrubbing.
- Check corners, seams, labels, and tray edges for remaining residue, then wipe and dry those areas before reassembly.
- Reset the organizer only after all compartments, dividers, trays, and inserts are dry so stored supplies return to clean, dry sections.
The effort needed to clean compartments and dividers depends on compartment layout, divider access, and the amount of residue trapped around corners or removable inserts.
When removable inserts or trays have moisture-sensitive materials or finishes, limit water exposure and allow adequate drying time before resetting the organizer. This helps separate residue removal from material care while keeping storage areas ready for use.
This chart shows the three-step process for cleaning compartments, dividers, and trays, including key checks and material care precautions.

Emptying Supplies Before Cleaning
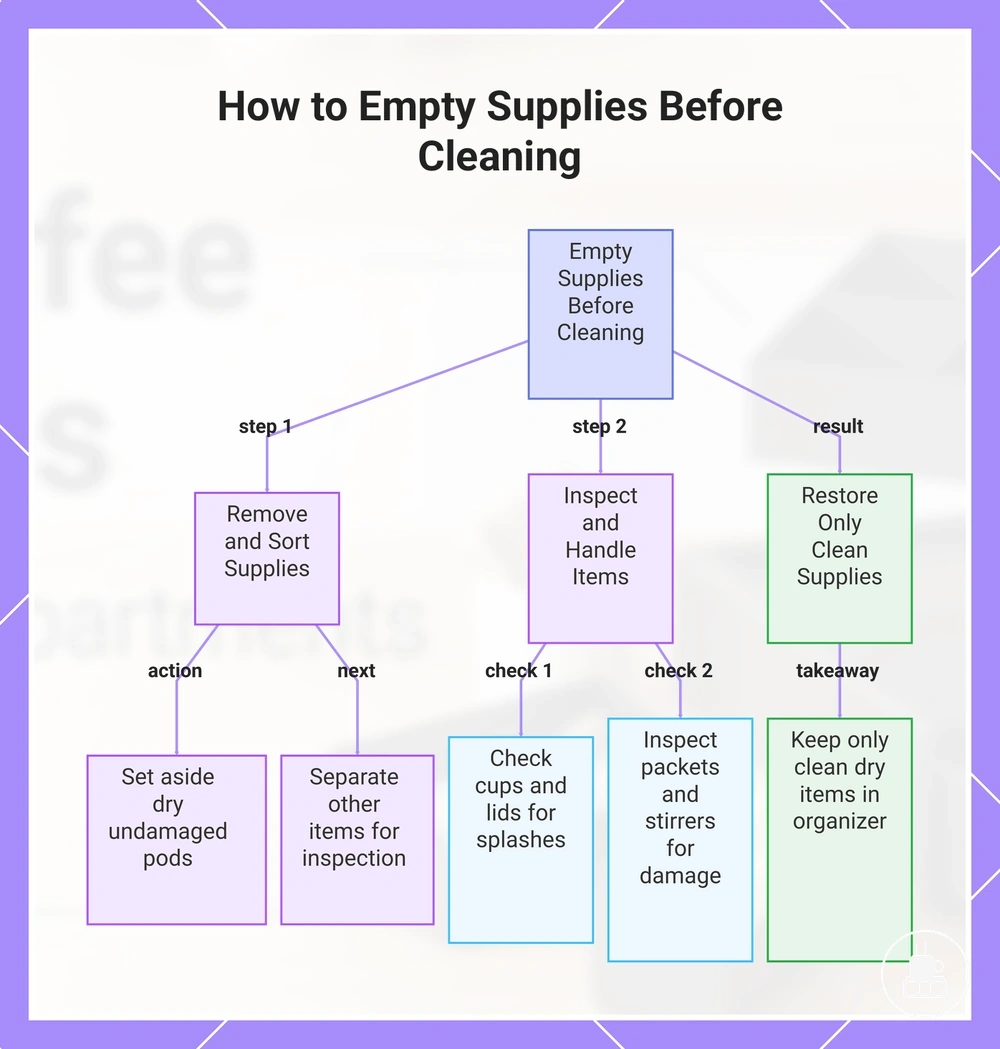
Emptying supplies before cleaning keeps pods, cups, packets, stirrers, lids, and sweeteners away from moisture while organizer surfaces are cleaned. Remove supplies before using a damp cloth so dry storage stays separate from spill-affected items. Sort supplies before cleaning begins, then keep dry items separate from anything that is damp, sticky, or spill-affected. Finish preparation by grouping items for either reuse or cleaning after the organizer is ready.
- Set aside pods that remain dry and undamaged so they can return after the organizer is clean and dry.
- Check cups and lids for coffee splashes or dust. Wipe clean items if appropriate, or relocate them until the cleaning process is complete.
- Inspect packets of sweeteners or similar items. Discard packets only if the packaging is spill-affected, torn, or sticky; otherwise keep them in a dry location.
- Separate stirrers and other loose supplies from damp areas so they remain suitable for dry storage during cleaning.
If a spill affects packets or lids, sort those items before returning anything to the organizer. Keeping only clean, dry supplies in the organizer helps maintain pod cup and condiment storage after the organizer has been cleaned and reset.
This chart shows the steps to empty and sort supplies before cleaning the organizer, ensuring dry items stay separate and only clean, dry supplies return.
Removable Dividers and Washable Parts
Removable dividers and washable parts improve cleaning access by allowing inserts and divider pieces to be cleaned separately before they are reinserted. Remove each part carefully, clean it according to its material, and allow it to air-dry before putting it back in place. Washable parts may be suitable for handwash and a light rinse when their material or care guidance allows it, but removable parts are not automatically dishwasher-safe or fully waterproof. Dry every part completely before reinsertion so the fit remains secure.
Removable Dividers and Washable Parts are easiest to manage by following this removal-to-reinsert sequence:
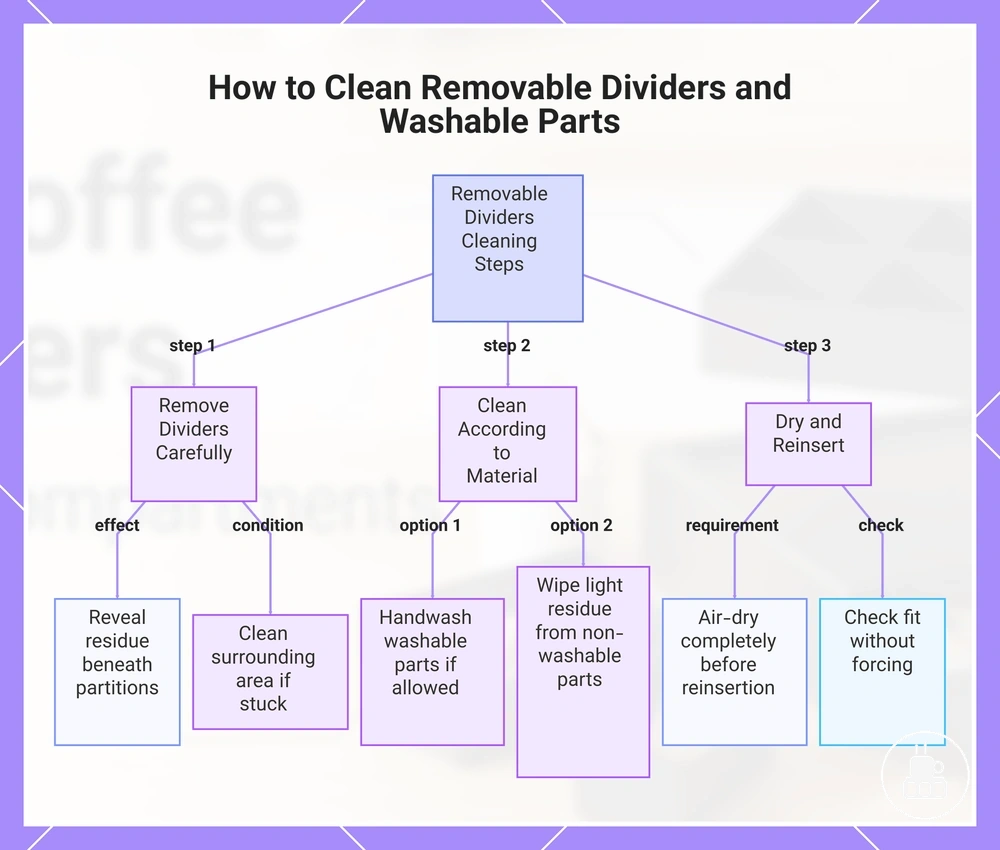
- Remove removable dividers or inserts carefully to improve access to residue beneath or around partitions.
- Handwash washable parts only when their material or care guidance allows it, then rinse gently if needed before allowing them to air-dry.
- Wipe light residue from divider pieces that do not require washing to reduce unnecessary moisture exposure.
- Reinsert each insert or divider only after it is completely dry, then check the fit to confirm it is seated correctly without forcing it into place.
If residue makes a divider difficult to remove or reinsert, clean the surrounding area first and try again after remaining moisture has dried. A proper fit helps restore normal compartment access while reducing unnecessary stress on removable parts.
This chart shows the three-step sequence for cleaning and reinserting removable dividers, including material-based cleaning options.
Fixed Compartments and Tight Corners
Fixed compartments and tight corners require smaller cleaning tools because these areas cannot be removed for separate cleaning. A soft brush, microfiber cloth, or cotton swab can help reach trapped crumbs and residue while limiting unnecessary surface wear. Match the tool to the corner depth, seams, residue type, and moisture access, then leave the area dry after cleaning. Limit moisture around seams, adhesives, unfinished wood, or other hard-to-dry areas.
Fixed Compartments and Tight Corners are easier to clean with access-safe tools matched to the residue:
- Use a soft brush to loosen trapped crumbs inside fixed compartments while reducing the risk of surface damage.
- Use a microfiber cloth to wipe light coffee residue around seams without leaving excess moisture.
- Use a cotton swab to reach syrup or residue inside tight corners where larger tools may not fit easily.
- Clean sticky residue with staged, gentle wiping rather than scraping, then allow the cleaned area to remain dry before replacing stored supplies.
Drip Mat and Counter Protection Maintenance
Drip Mat and Counter Protection Maintenance controls splashes, standing moisture, stains, and residue beneath or around a coffee station organizer. A drip mat or protective tray helps separate spills from the counter surface, but cleaning needs depend on material, absorbency, raised edge, backing, and washability. Washable trays, silicone mats, absorbent mats, and quick-dry pads handle moisture differently, so maintenance should follow their condition rather than a single routine. Regular checks should focus on absorbency, edges, backing, and drying.
Wipe or wash a drip mat when residue, spills, or standing moisture are present, and allow it to air dry before placing it back under the organizer when appropriate for its material. Remove the mat during deeper cleaning to inspect the counter-contact area and backing for hidden moisture or stains. If a mat remains damp, develops persistent residue, or no longer performs as intended because of its condition, replacement may be appropriate. The comparison below highlights common maintenance differences.
| Mat or tray type | Spill behavior | Cleaning action | Drying or replacement signal |
|---|---|---|---|
| Washable tray | Collects spills within a raised edge | Rinse or wipe away residue, then dry | Allow to dry before reuse if moisture remains |
| Wipe-clean mat | Holds light spills on the surface | Wipe visible residue and moisture from the surface | Air dry before returning under the organizer |
| Absorbent mat | Absorbs liquid instead of holding it on the surface | Clean according to its care guidance | Air dry fully; consider replacement if odor or persistent stains remain |
| Quick-dry pad | May dry faster after light spill exposure | Wipe or clean when residue is visible | Replace if drying performance declines because of wear or condition |
| Non-slip-backed mat | Helps keep the mat in place while spills occur | Lift and clean both the mat and the counter beneath it | Remove for inspection if hidden moisture or stains develop under the backing |
Maintenance decisions depend on how each mat or tray manages spills and drying rather than on appearance alone. A raised edge can help contain liquid, while an absorbent mat may need more drying time after heavier spill exposure. Checking the backing and counter-contact area during routine cleaning can help identify trapped moisture before returning the organizer.
During deep cleaning, remove the drip mat completely so both sides and the counter underneath can dry before reassembly. This keeps counter protection focused on moisture control without turning mat care into a buying guide.
Washable Trays and Wipe-Clean Drip Mats
Washable trays and wipe-clean drip mats should be removed, cleared of surface liquid and residue, cleaned according to their material, and dried underneath before they are returned to the counter. Raised edges can collect liquid, while a non-slip backing may retain moisture if it is replaced too soon. Washability depends on the tray material, backing, and care instructions rather than assuming compatibility with every dishwasher, heat cycle, or cleaner. The underside should be dry before the tray or mat is returned to help maintain a dry counter.
Washable Trays and Wipe-Clean Drip Mats follow a simple sequence for handling surface liquid and residue:
- Remove the washable tray or wipe-clean drip mat, then clear visible liquid and wipe the counter beneath it.
- Clean raised edges by wiping away residue, then rinse only when the tray material and care guidance allow it.
- Use handwash when appropriate for the tray material, and avoid assuming every washable tray is suitable for a dishwasher or heat cycle.
- Inspect the non-slip backing, then air dry the underside completely before returning the tray or mat to the dry counter.
Milk, syrup, or sweetener residue may require repeated gentle wiping before the tray or mat is ready for reuse. If the backing remains damp after cleaning, continue air drying before returning it to the organizer.
Absorbent and Quick-Dry Mats
An absorbent mat and a quick-dry mat differ mainly in how they handle liquid load, drying speed, stain visibility, and backing condition during routine maintenance. An absorbent mat may retain more moisture before drying, while a quick-dry mat may release moisture more quickly depending on its material and condition. The backing should also be checked because hidden moisture can remain beneath the mat even when the surface appears dry. A saturated or damp mat needs drying attention before it is returned to the organizer area.
Absorbent and Quick-Dry Mats benefit from condition-based maintenance decisions:
- Light splash: Check the liquid load, wipe away visible moisture, and allow the mat to air-dry if dampness remains.
- Saturated mat: Inspect the backing and drying speed, then wash the mat when its material and care guidance allow it before thorough air drying.
- Hidden stains: Check both the surface and backing for stain visibility, then wash or replace the mat if cleaning no longer restores a suitable condition.
- Odor risk: If moisture remains trapped after repeated drying, inspect the backing and consider replacement when washing and air drying no longer resolve the condition.
Drying, Airing, and Resetting Supplies
Cleaned organizer parts should be completely dry before pods, cups, condiments, or packets are returned. Airing organizer parts and checking contact areas before resetting supplies can help reduce damp storage and recurring residue. Returning supplies only after drying also helps limit trapped moisture beneath stored items.
Trapped moisture can remain in corners, underneath removable parts, or where supplies rest against the organizer. Check contact areas before returning supplies, and inspect the packaging condition of pods, packets, and condiments for dampness, stickiness, or visible damage. If packaging is affected by moisture or spills, discard or relocate the item according to its condition. Follow the reset sequence below after drying and inspection are complete.
Drying, Airing, and Resetting Supplies prevents damp storage and recurring residue by returning each supply group only after it is ready for dry storage.
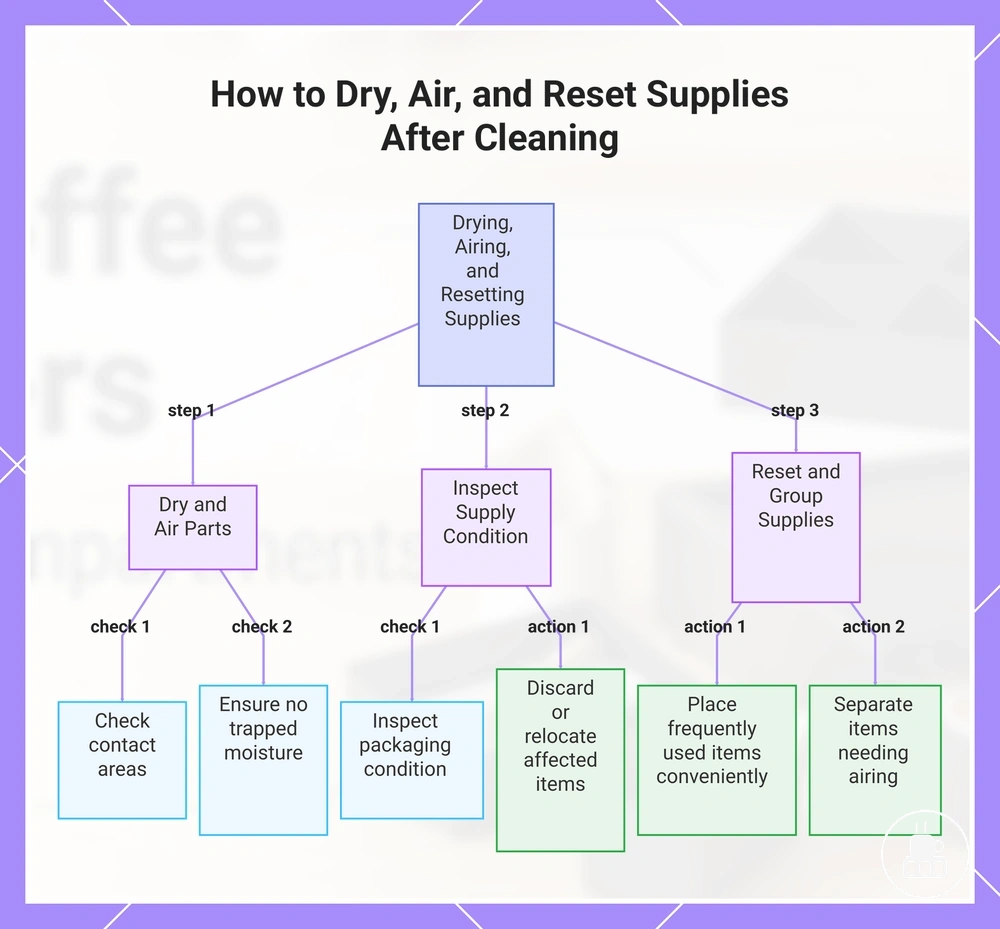
- Confirm that cleaned organizer parts are dry, then check for trapped moisture before returning supplies.
- Inspect pods, cups, condiments, and packets. Return dry items, discard packaging that is damaged or heavily affected by spills, and relocate items that still need drying.
- Place frequently used supplies where daily access is convenient without covering damp contact areas or restricting airflow.
- Complete resetting supplies only after the organizer, contact surfaces, and stored items are dry so the station is ready for regular use.
Group supplies according to daily use so commonly reached items remain easy to access after cleaning. Separate any item that still needs additional airing from dry storage until its packaging condition is suitable for return.
This maintenance reset focuses on post-cleaning readiness rather than a full setup process. For broader organization beyond maintenance, see the daily setup workflow. A careful reset order can help reduce future crumbs, spills, and sticky buildup.
This chart shows the three main steps to dry, air, inspect, and reset supplies, preventing damp storage and recurring residue.
Preventing Spills, Crumbs, Stains, and Sticky Residue
Preventing spills, crumbs, stains, and sticky residue after cleaning can reduce repeated maintenance and help keep the organizer ready for daily use. Small messes often begin with supply placement, packet handling, syrup bottles, pod crumbs, or repeated drip exposure. Addressing these sources early can reduce the cleaning burden over time, especially when supplies are returned to suitable locations after each use. Careful supply placement is the main habit that supports ongoing residue control.
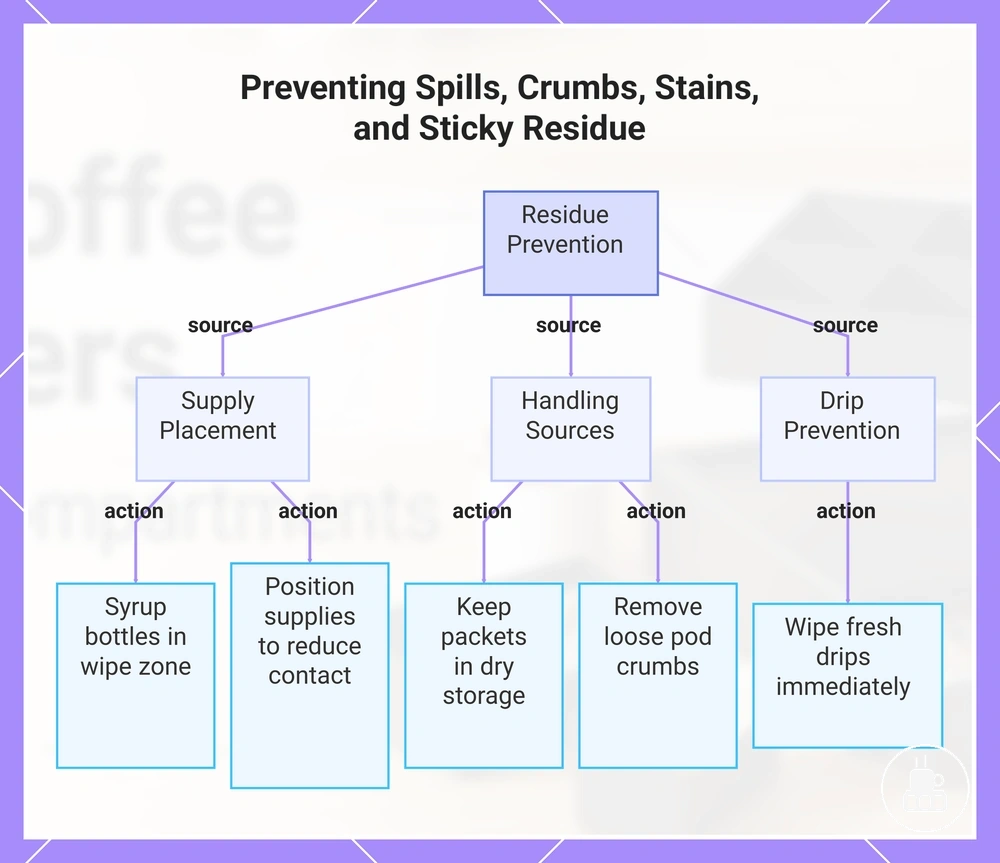
On a high-use counter or in a shared coffee station, spills and crumbs may build up more quickly because supplies are handled more often. Keeping sweetener packets dry, placing syrup bottles in an easy-to-wipe area, and limiting unnecessary counter contact can help reduce sticky residue. Pod crumbs are easier to manage when they are removed regularly instead of being allowed to collect inside compartments. Preventing Spills, Crumbs, Stains, and Sticky Residue becomes more manageable when each source of mess is addressed consistently. The checklist below organizes prevention by the main sources of residue.
- Syrup bottles: Place bottles in a dedicated wipe zone to help contain sticky residue and reduce the cleaning burden.
- Packet handling: Keep sweetener packets in dry storage and replace packets if moisture or spills affect their packaging.
- Pod crumbs: Remove loose crumbs from compartments during routine use to help reduce residue buildup.
- Drip exposure: Wipe fresh drips before they spread across nearby surfaces or increase stain risk.
- Counter contact: Position frequently used supplies to reduce unnecessary contact with wet or spill-prone areas.
Recurring spills, crumbs, or sticky buildup may indicate that supply placement or handling habits need adjustment rather than another complete cleaning cycle. Small preventive changes can reduce future cleaning effort without turning maintenance into a storage or capacity guide.
This chart groups the main sources of residue and shows the specific preventive actions for each source, based on the article's checklist.
Cleaning Problems That Signal a Setup Issue
Repeated cleaning problems may signal a layout, material, fit, or supply-control issue rather than cleaning effort alone. When the same cleaning symptom returns soon after maintenance, the organizer setup may need attention instead of repeating the same routine. The most effective approach is to match each symptom with its likely cause before choosing the next action.
Recurring spills, trapped crumbs, damp mats, sticky compartments, and overfilled areas often develop from different setup conditions. Recurring spills may relate to layout or supply placement, while trapped crumbs can indicate limited compartment access. Damp mats may result from moisture beneath the backing, and sticky compartments can reflect repeated contact with syrup bottles or sweetener packets. Overfilled areas may reduce access for routine maintenance. The diagnostic table below groups each cleaning symptom with its likely cause, what to check, and the next maintenance response.
| Cleaning symptom | Likely setup factor | What to check | Maintenance response |
|---|---|---|---|
| Recurring spills | Layout or supply placement | Frequently used items and spill-prone areas | Adjust placement and monitor whether the pattern improves |
| Trapped crumbs | Compartment access or fit | Corners, dividers, and narrow storage areas | Improve access for routine cleaning and residue removal |
| Damp mats | Moisture beneath the backing | Backing, counter contact, and drying condition | Air-dry thoroughly and consider replacement only if the condition persists |
| Sticky compartments | Supply-control around syrup or sweeteners | Areas exposed to repeated spills or residue | Clean the affected area and review supply placement |
| Overfilled areas | Supply-control or limited storage space | Available access for routine maintenance | Reduce crowding where appropriate and maintain easier cleaning access |
The diagnostic table helps separate a cleaning symptom from a setup issue so maintenance can focus on the most likely cause. If the same symptom continues after reasonable cleaning and placement adjustments, reassess the organizer condition instead of repeating the same cleaning routine.
When repeated cleaning problems continue despite routine maintenance, the next action may involve adjusting setup, storage capacity, or supply placement rather than cleaning alone. For broader setup-related guidance, see clutter and spill problems.